To see the Northern Lights had always been a dream of mine, but the sheer cost of the trip had always been a major factor. Our 5 nights in Norway (Tromsø) and Sweden (Abisko) wasn’t cheap, but was worth every penny when we saw the dancing auroras circling above us in the cosmic wind and they have undoubtedly left a lasting memory.
What are the Northern Lights?
To put in simple terms, the Sun ejects electrically charged particles and this is known as the Solar Wind. When the solar wind collides with our magnetic field, namely the North and South Pole, they can enter Earth’s atmosphere at these points. As they enter our atmosphere, they put on a display of colours as the solar wind mixes with the various gases. When above 200km altitude the ions mix with oxygen and the particles turn red. When between 100km and 200km they come into contact with oxygen and nitrogen and they display as blue and green. And when they are below 100km they mix with just nitrogen and you’ll see them as a pink/crimson colour.
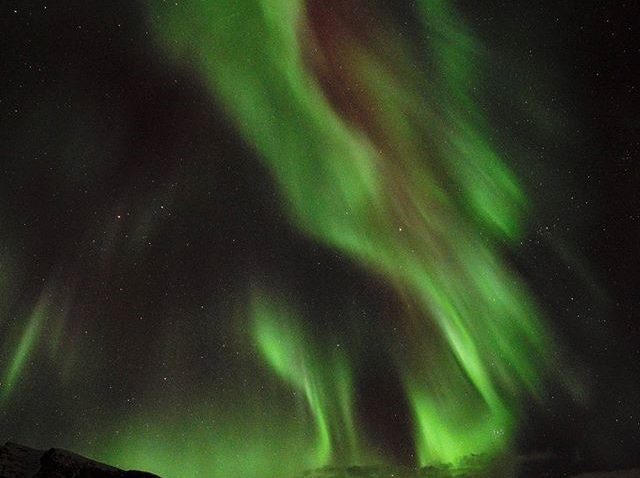
Photo credit: Ruby Jutlay
When to go?
The Aurora Borealis (“Northern Dawn”) as they are known, come into action during the winter months of October to March. The Northern Lights activity take place on an 11 year cycle known as the Solar Cycle. The last one being in 2013 when the activity was at its highest peak. But to see the lights all you need is a clear sky at night. TOP TIP: Ideally you should go when there is a new moon as the brightness from the full moon can also affect the viewing if the aurora is weak. We went during the new moon in March and saw spectacular displays that did not disappoint.
Where to go?
There are a number a countries you can choose from, Alaska, Iceland, Finland, Greenland, Norway, Siberia and Sweden. We chose to go to Tromsø in Norway for two nights, and Abisko in Sweden for three. We chose Tromsø as it was in Lapland and very near the Arctic Circle and easy to get to from Oslo, and Abisko because the Sky Station is situated at the perfect degrees to view the lights and also very easily commutable from Norway by train.
Hotels
There are about two dozen hotels to choose from in Tromsø, but there are only a couple in Abisko and these get booked very quickly, so book early if you can.
In Abisko, Sweden, we stayed at Turiststation STF hotel which is within walking distance from the train station and offers great half board meals. Its location is part of the Abisko National Park, so you might see the odd reindeer! The views from the dining room overlooking the frozen Lake Torneträsk and snow filled mountain backdrops makes it a very picturesque hotel. The Sky Station is also a short walk from the hotel too.
Clothing
It is essential you take the correct clothing when planning a trip to see the Northern Lights. Temperatures late in the evening can plummet to -10°C if not more, and if you are not prepared you will suffer as you can spend hours in the cold waiting or chasing the lights.
See my Top Tips below to pack the right stuff:
Tip #1 – Wear ski pants with a rating of at least 5,000mm – 10,000mm. Standing still, your legs will get cold so it’s important you take a good quality pair of ski pants.
Tip #2 – Wear a ski jacket with a rating of at least 5,000mm – 10,000mm. Make sure you have zipped up fully before heading out at night.
Tip #3 – Never take cotton clothing. Cotton when wet with moisture will just make you feel colder.
Tip #4 – Wear layers of thermals/base layers. Merino or a synthetic fabric wick moisture away from the skin very effectively keeping your skin warm and dry. Those long johns you bought all those years ago – well now’s the time to get them out! Base layers under your ski pants isn’t to everyone’s liking, but it’s better to be warm then freeze in the extreme temperatures.
Tip #5 – Take Merino socks. There are a variety of socks to choose from. I found really thick socks didn’t actually keep my feet warm and my feet felt really tight in my boots. I recommend Smartwool socks. Although not cheap, they do have a good range and certainly worth paying extra for. I found the mid PhD range perfect.
Tip #6 – A balaclava or something similar like a neck gaiter. If you are hit by an unexpected blizzard, you will need to cover your face.
Tip #7 – Take a hat that covers your ears. It’s important you don’t let the heat escape your body.
Tip #8 – Invest in a good pair of gloves. Keeping your hands warm is imperative. Mittens are good for the day but gloves are more practical in the evening.
Tip #9 – Make sure you have a pair of good quality hiking/ski boots. It’s a good idea to wear these a good few times just to break them in if they are brand new. There’s nothing worse than aching sore feet. Also make sure your socks aren’t too big that your boot don’t fit!
Tip #10 – Invest in some snow grips. Yaktrax Pro are a god send when walking on icy roads/mountains. They can be a bit tricky to put on and you will think you’d ordered the wrong size! But they need to be a nice snug fit under your boots.
Other Essential Items
Hand warmers – In the evenings waiting for the Aurora to appear can be a long drawn out process. Hand warmers last a good few hours and keep the tips of your fingers warm.
Red torch – A little red torch you can hang off your jacket or a red headlamp. It’s important you don’t take a white torch as it’s bright light will upset your fellow photographers! It’s pitch black in the fields and any artificial light can interfere with the camera shots. A red light is less invasive, but just as practical when you need to make adjustments to your camera settings.
Thermos – I listed this because I loved drinking hot chocolate in the freezing fields on the cold nights when we were waiting for the Aurora’s to show!
Lip moisturiser – Good lip protector is essential. The lips tend to really dry up and can chap in the cold.
Face moisturiser – It’s vital you take a good moisturiser with you as the extreme weather in the evening can be quite harsh to the skin. I was recommended Kiehl’s Ultra Facial Cream which was great and kept my face hydrated.
Sunglasses – As it can get very bright during the day in the snow.
Camera – A point and shoot camera will not be good enough, you will need a DSLR like a Nikon or Canon to get those memorable shots. Get to know your camera and familiarise yourself with the settings because when you are standing in the freezing cold your brain just turns to mush and you forget how to use it!
Batteries – Your camera batteries will get drained a little bit quicker in the cold weather, so take two batteries, but keep them warm in your pocket until you are ready to actually start shooting.
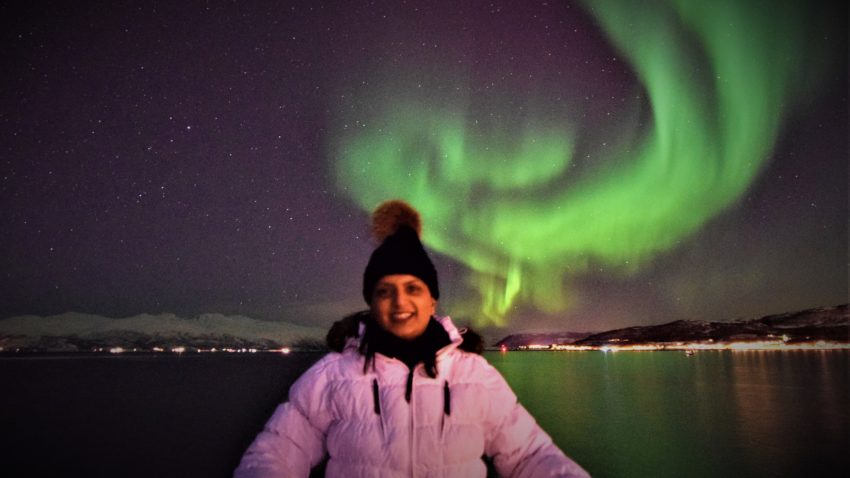
Photo credit: Ruby Jutlay
Remote Control – This might sound like an odd thing to take, but by using a remote control wired or wireless, is the best way to start shooting as it means you don’t have to be right next to camera and you don’t have to take your gloves off. Also great for taking a selfie under the lights!
Lens – It’s ok to take the normal kit lens that comes with your camera, but for those enthusiasts out there then I recommend the 14-24mm Nikon and a Wide lens (Nikon, Canon or Sigma) to capture more of the sky. You can hire lens from a number of online companies, which is what I did. You’ll find a fantastic range of lenses for all occasions and most companies will even post the lens out to you. 5 days cost me about £60 instead of buying the lens for £1200!
Tripod – You don’t need an overly expensive tripod, but you need a sturdy one and one that is light to carry. It is essential you take a tripod as you will be shooting long exposures and you cannot hold the camera in your hand as you will just end up with a blurry shot.
SD Cards – Make sure you take an Extreme SanDisk as they are designed to be used in extreme weathers. They come in a variety of sizes, but the 16GB one I took had ample space to take as many photos as I wanted, on a typical night you can take around 2GB worth of RAW photos.
How to Photograph the Northern Lights
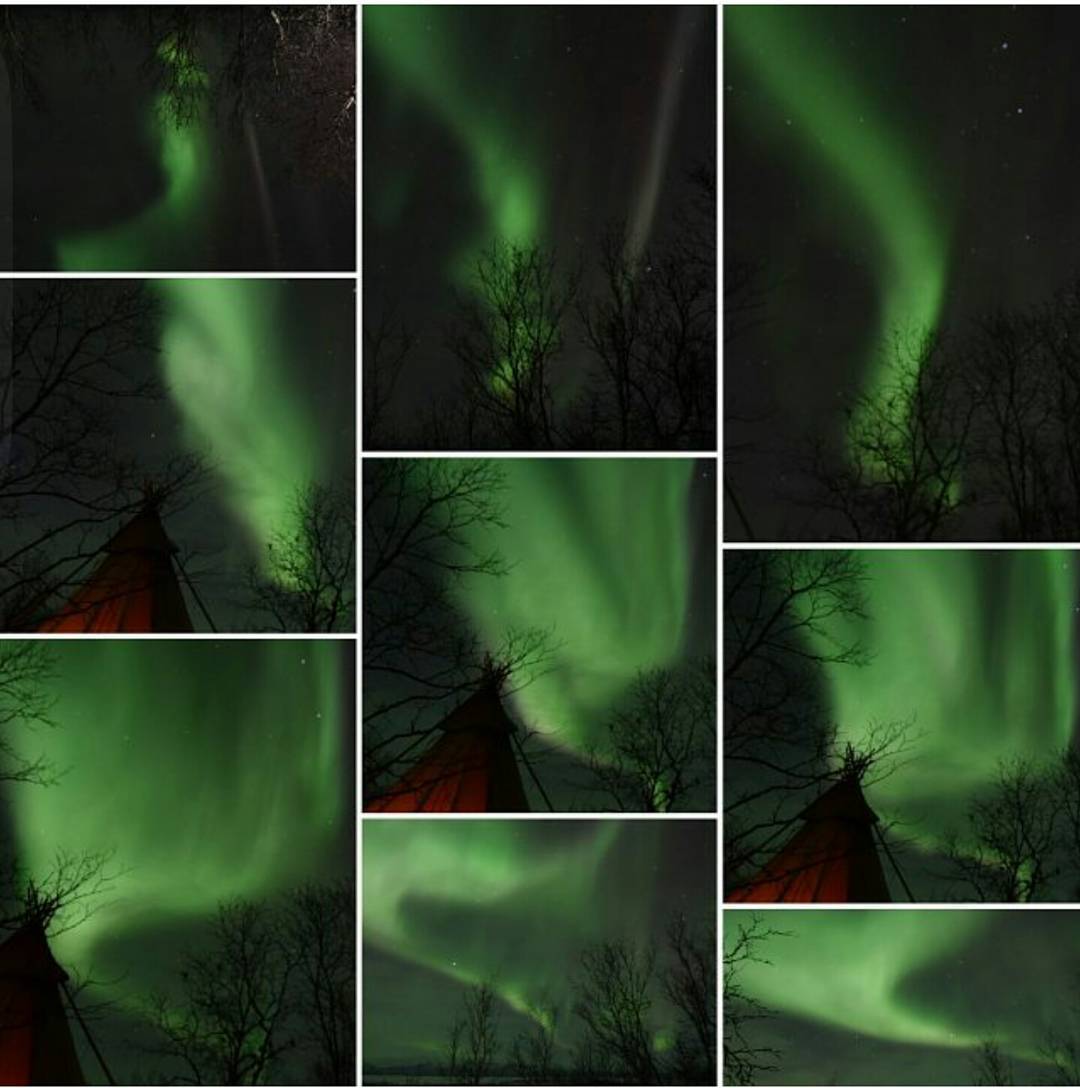
Photo credit: Ruby Jutlay
I’m by no means a professional photographer, but what I did do before I went on this trip was to learn how to setup my Nikon DSLR. It’s so vital you know how to change the Aperture, ISO and Shutter Speed manually. This is essentially all you need to know. As a guideline, most of the photos on this blog were taken in RAW mode at ISO 1600, aperture f2.8-f4.5 and a shutter speed between 5-10 seconds with a Nikon 14-24mm lens. This is because the activity was strong. If activity is weak, you would increase the shutter speed, Its also worth noting the best photos are the ones where you have managed to capture some background images, like trees or the back drop of the mountains. This is a great way to give your photo some dimension.
I recommend 7 Easy Steps to Your Own Amazing Photos as a great start to learn the basics to photographing those magical moments.
Our Itinerary
This itinerary was carefully tailored by Sunvil travel agent and myself. I do recommend you go through an agent when planning a trip to see the Northern Lights especially as there are so many activities you can do during the day and night. There is a lot to plan from the flights, hotels, train tickets, bus tickets, transfers to and from the airports, just to mention a few.
Sunvil’s recommended itinerary was slightly modified to suit our needs and also due to no availability we had to book other excursions.
Day 1 – Arrive in Tromsø, Norway
We arrived in Tromsø in the afternoon and as we hadn’t been able to book all our excursions through Sunvil, we headed straight to the Tromsø Tourists Visitor Centre to see what we could do during our time in Tromsø. The staff were really helpful and we managed to book all of our excursions with ease.
For our first night we booked the Northern Lights Dinner Cruise. This intimate gathering of 12 people on the boat was a fantastic way to start our adventure in Tromsø. The crew were friendly and the food they cooked was lovely. Must warn you that the Norwegians like their root vegetables quite crunchy! It had hardly been an hour and the Northern Lights started to creep up on us! Excited, we all run out onto the deck and got our cameras ready. No two displays are every going to be same, but what you do notice is how the wind swirls and mixes with the gases. We had about an hour of activity – what a way to introduce us to the amazing Northern Lights!

Photo credit: Ruby Jutlay
Day 2 – Explore Tromsø and Hunt for the Aurora’s
To keep ourselves busy during the day, we had booked Marianne’s fjord, whale, eagle and wildlife photography day time tour. This 4 hour tour had 6 of us driving through some of the most scenic views Tromsø has to offer. It was fun and informative and we were taken to many breathtaking viewpoints. We did see some wildlife and eagles but alas we were out of season to see the whales. We even visited Marianne’s grandad’s house for some hot drinks!
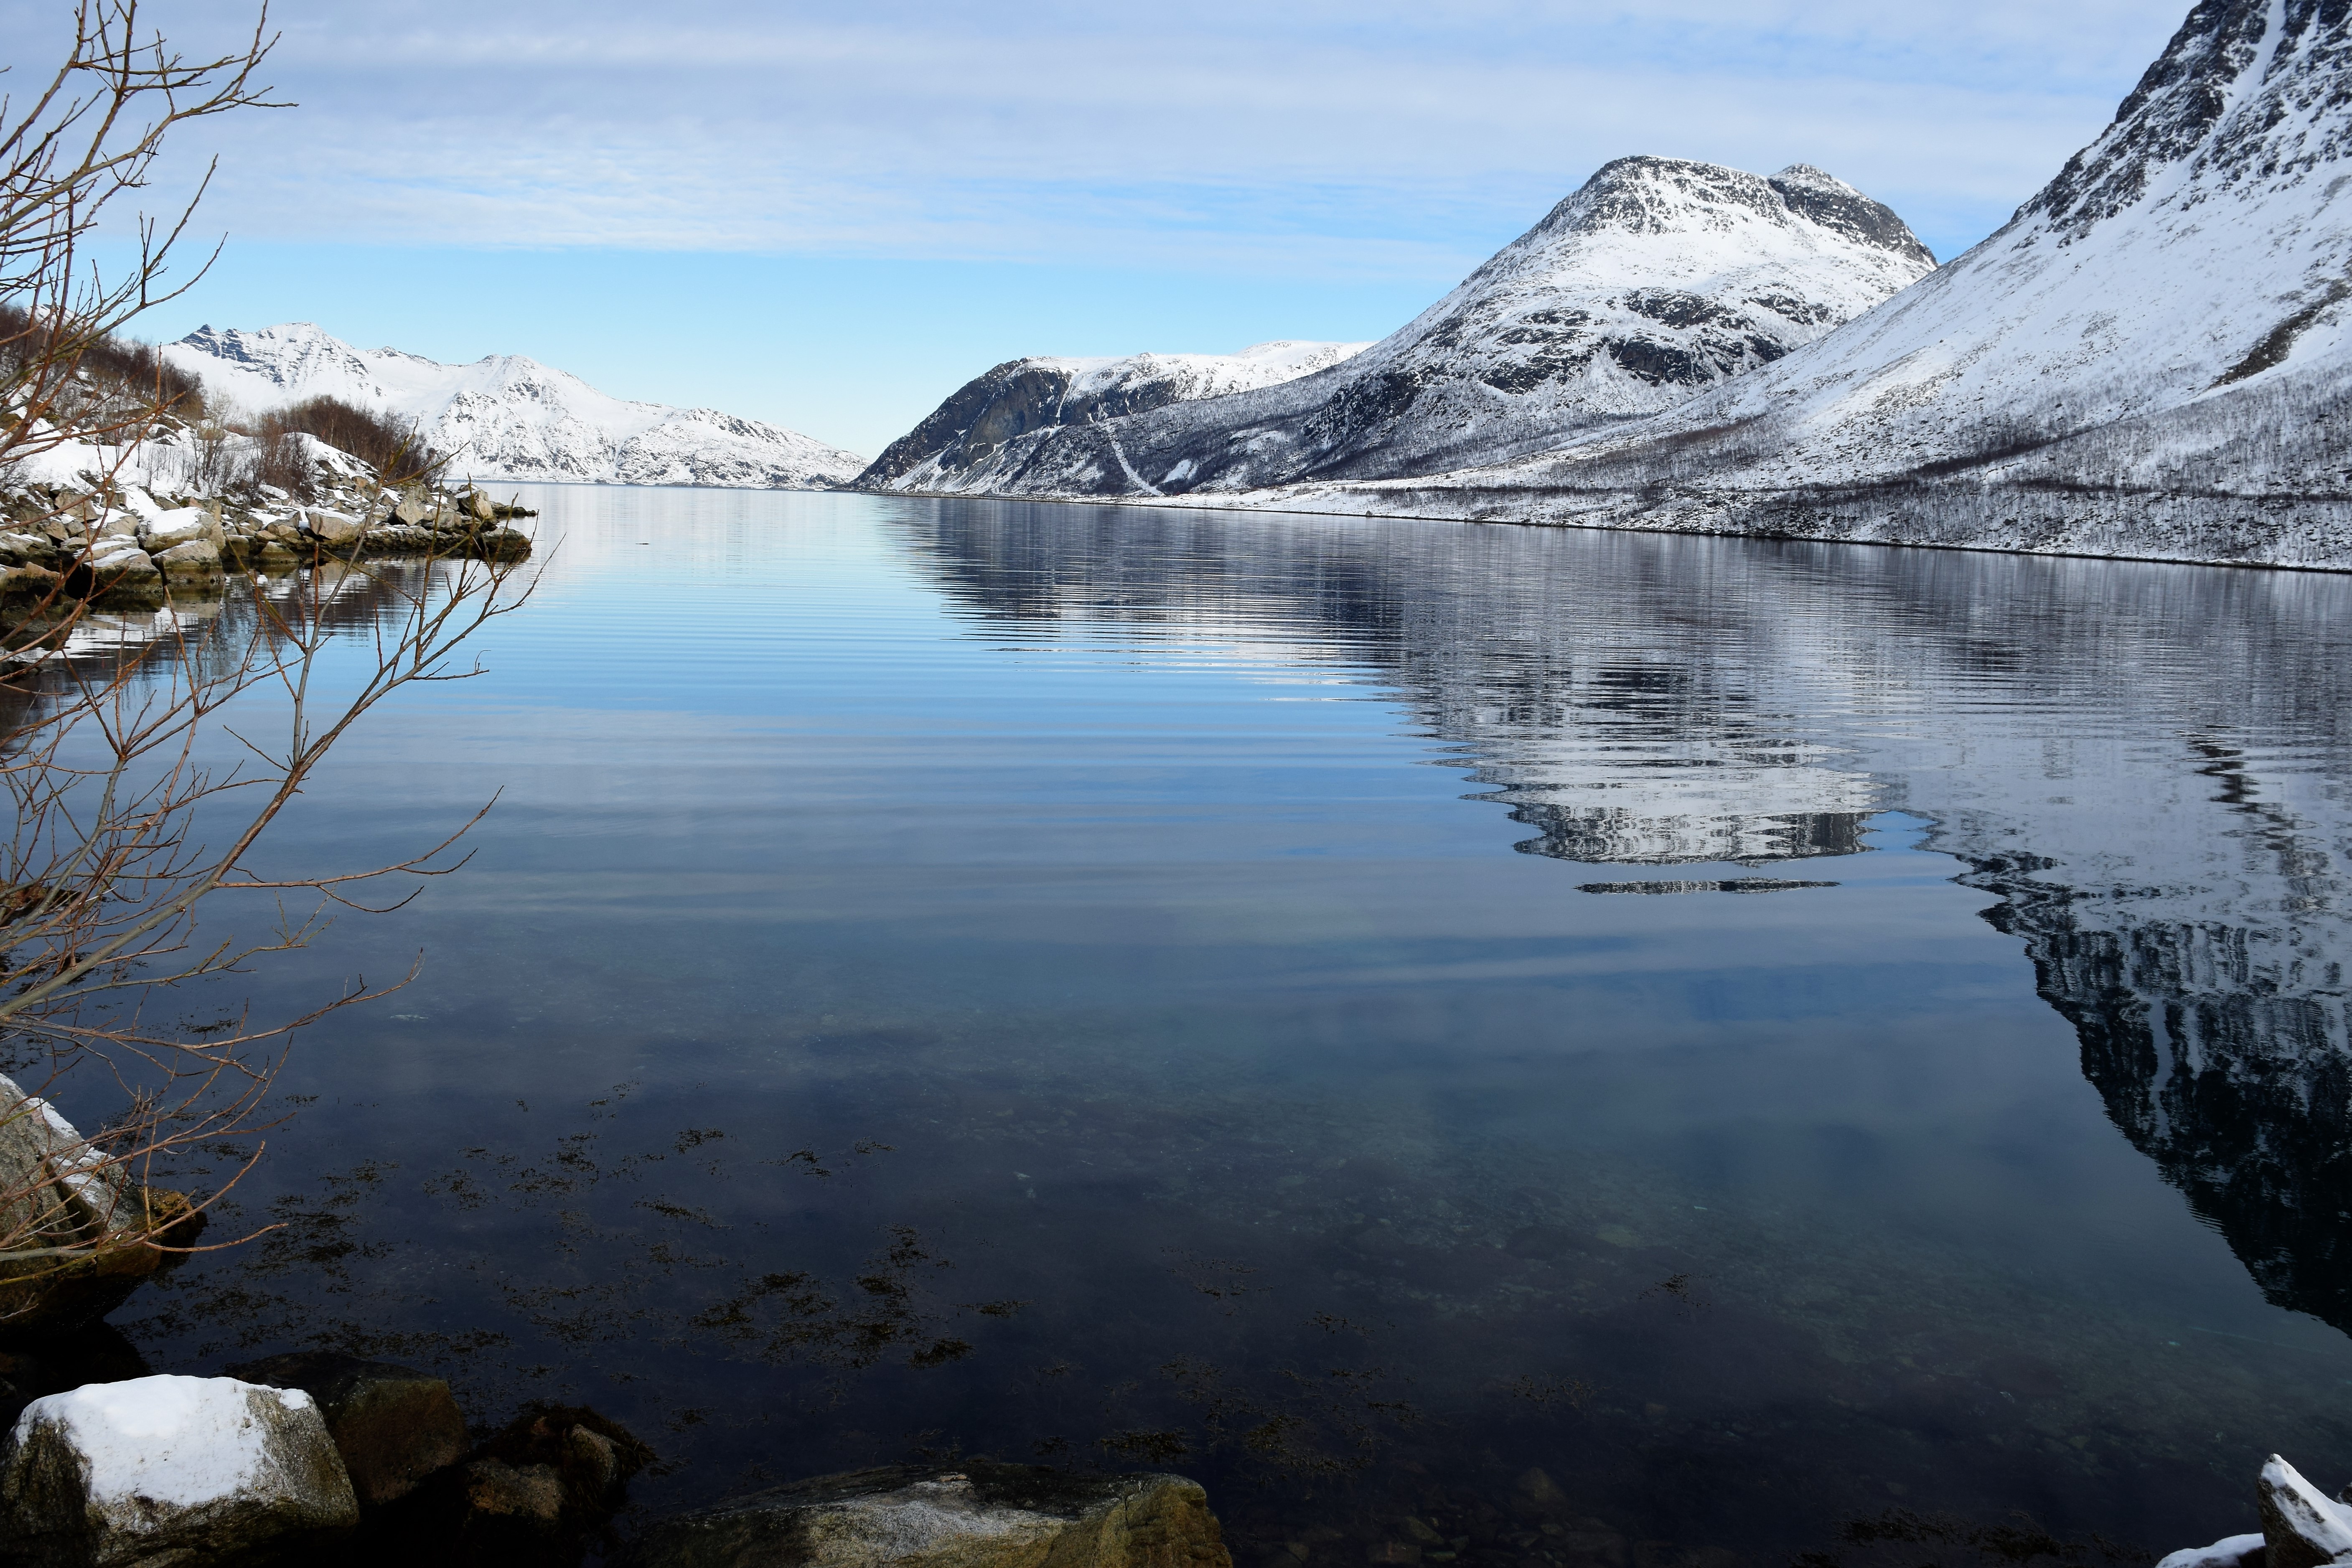
Photo credit: Ruby Jutlay
In the evening we went on The Aurora Hunt by minibus which came as part of our package. It started with a 45mins drive to the countryside where the weather reports were showing some activity. When we arrived, there was nothing, so we checked the weather reports again and continued to drive for another 30mins north. I guess this is where the phrase, ‘Chasing the lights’ comes from, but literally that is what you are doing! We went from one destination to another based on the weather reports and we almost reached the borders of Sweden/Finland before we ended up in a massive field and saw what can only be described as a mesmerising display of colours. We were so lucky to have seen corona after corana. A corana is when the wind circles round and round and then explodes in the middle giving you a full spectrum of colours, and as it lights up the whole sky 360 degrees, the only way to shoot is to get on your back and hold your camera straight above! Oh what fun we had but also almost froze to death!
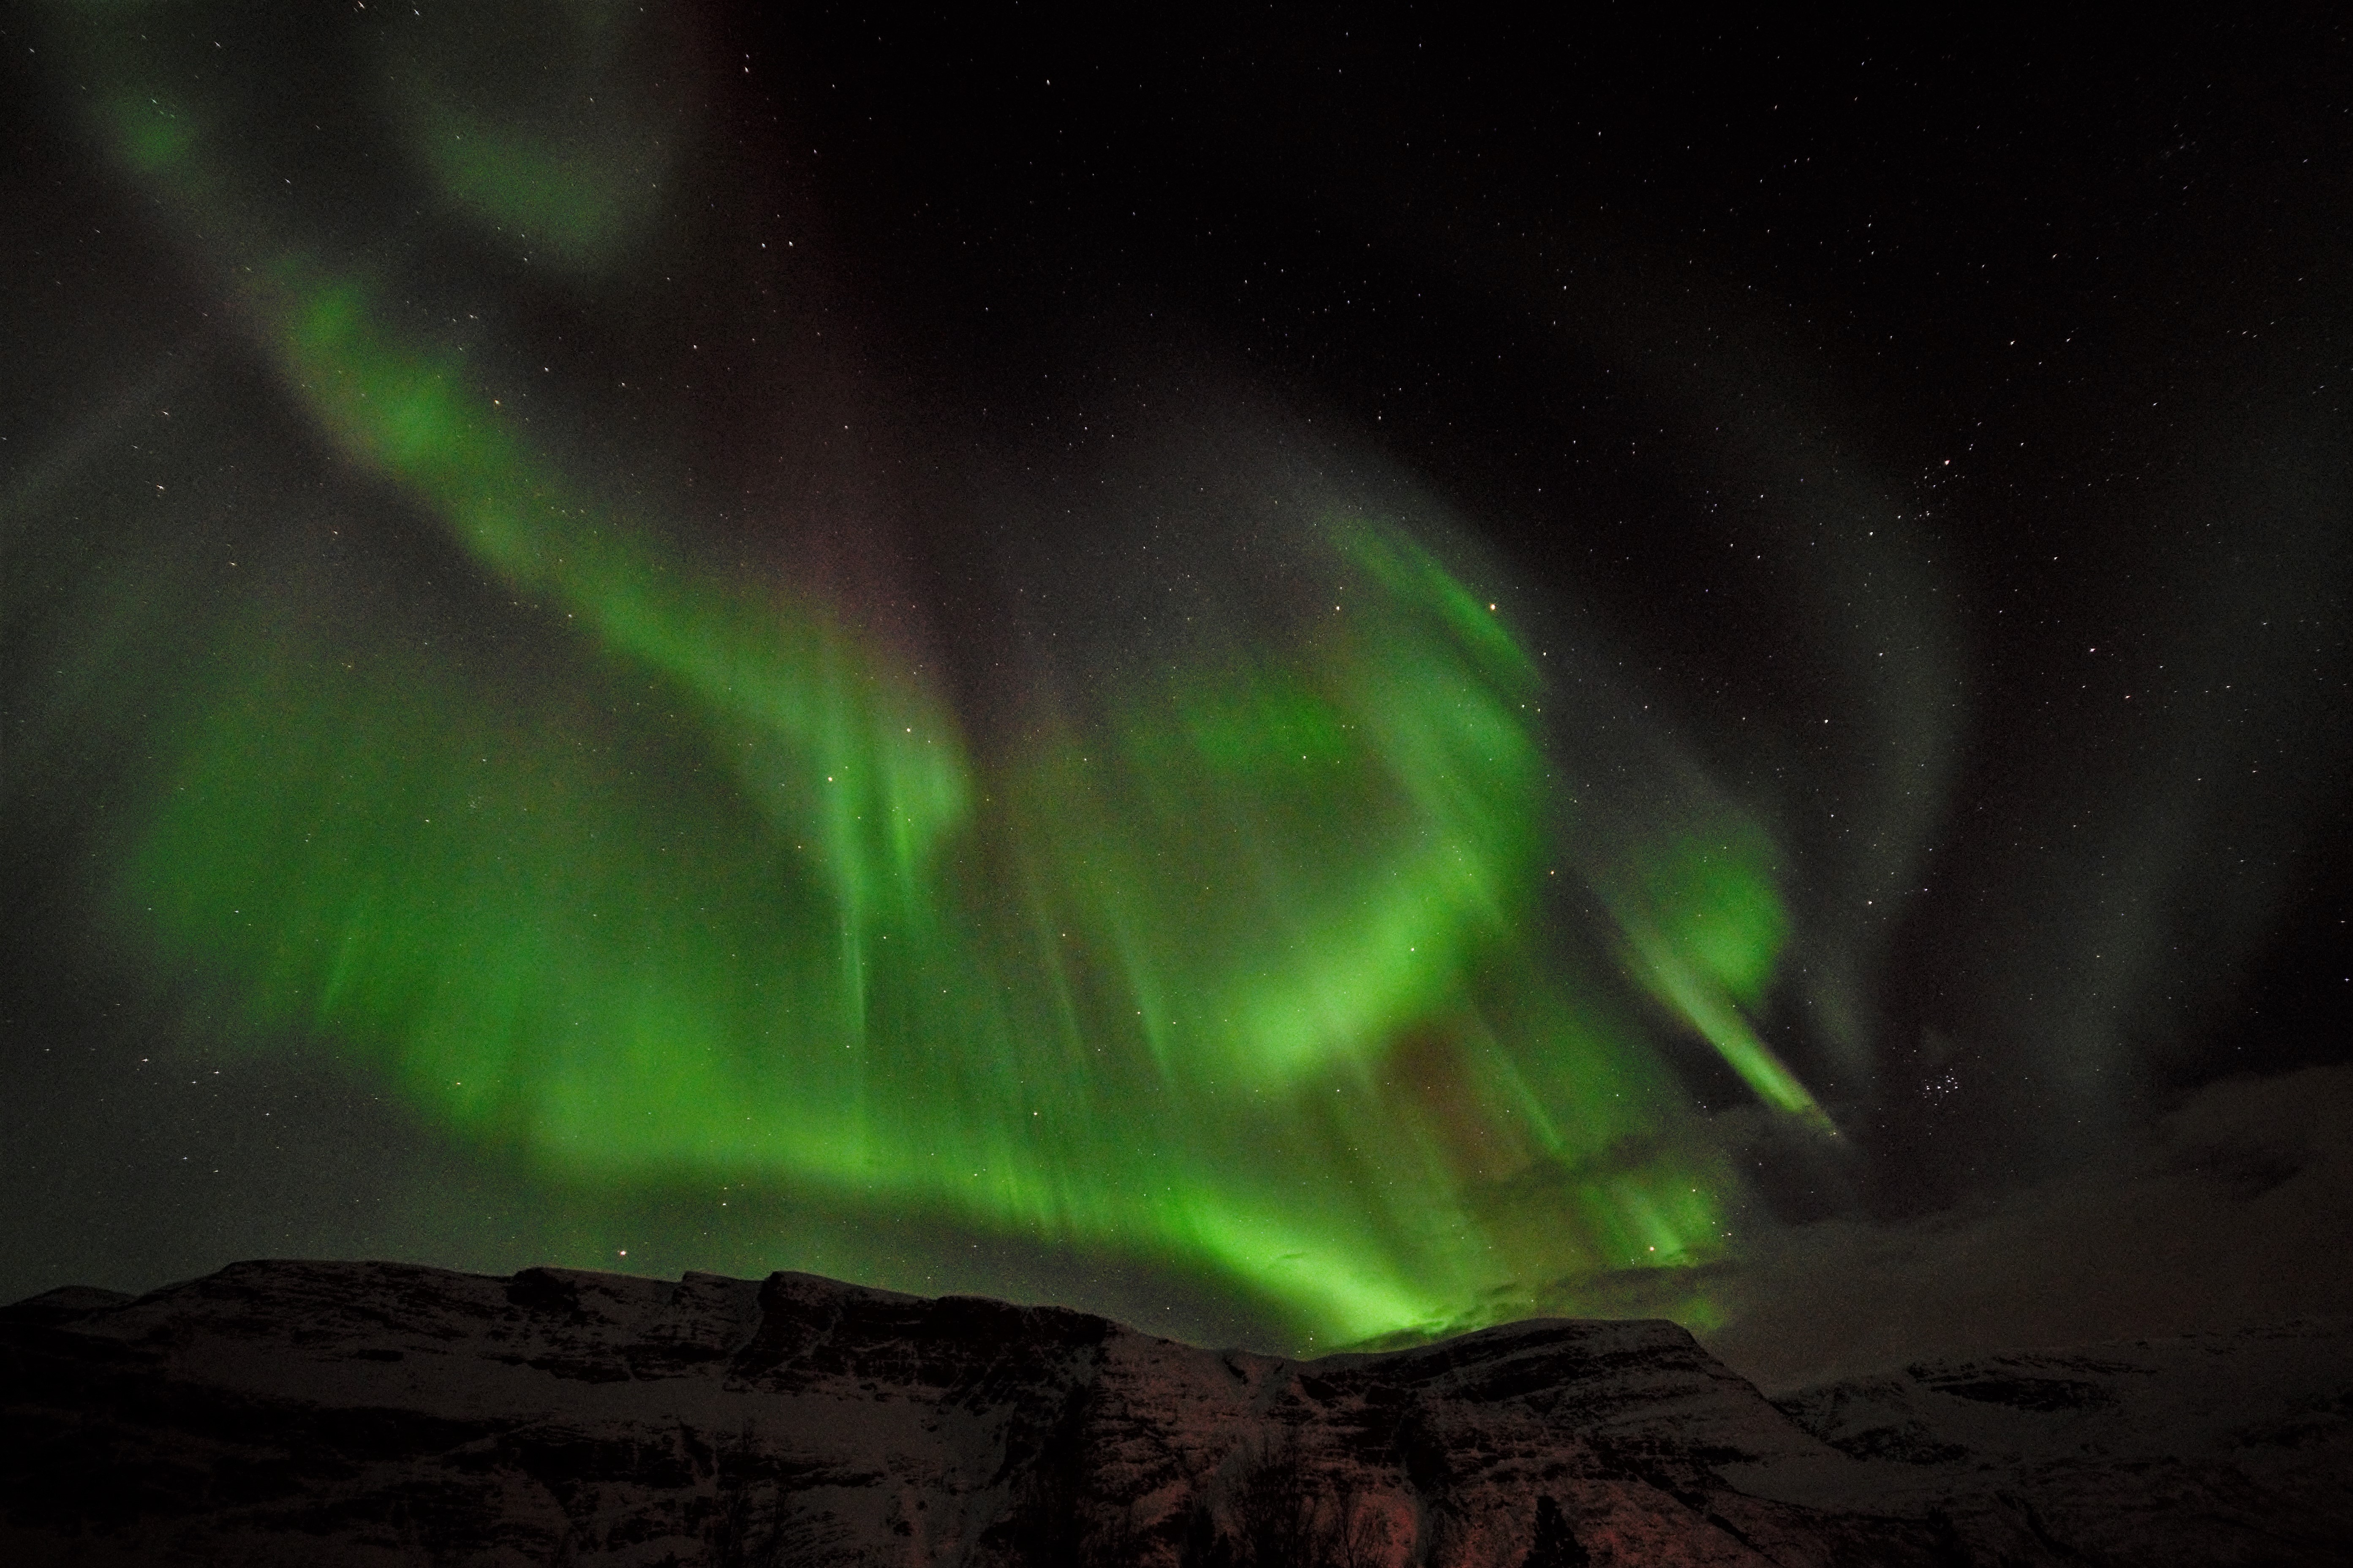
Photo credit: Ruby Jutlay
Day 3 – Arrive in Abisko, Sweden
We departed Tromsø early in the morning and took a bus to Narvik. It’s about 4 hours but the views on this bus are just amazing. Once we got to Narvik it was a short walk to the train station and we boarded the train to Abisko and crossed over to Sweden. This 2 hour journey is so scenic. We decided to rest on this night after a long day of travelling.
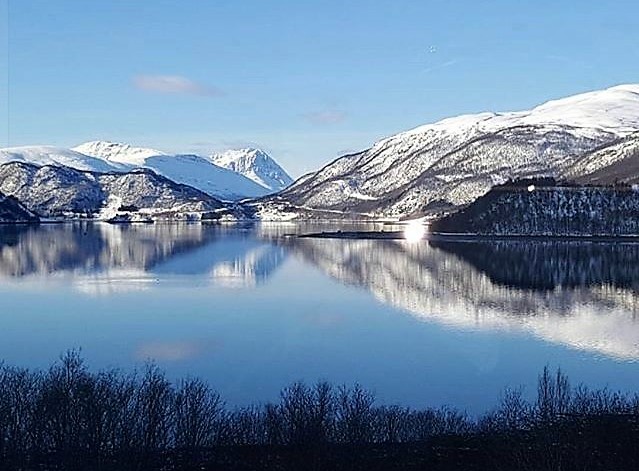
Photo credit: Ruby Jutlay
Day 4 – Visit the ICEHOTEL and Aurora Photo Tour
We had hoped to go to the ICEHOTEL on this day as a private tour which included lunch, but once again it was fully booked, but not undeterred we decided to plan this trip ourselves! We took the first train from Abisko to Kiruna and from there we took a cab to the ICEHOTEL. We had an hour at the hotel before we had to catch our last train back to Abisko!
The ICEHOTEL is a great place to visit but I wouldn’t want to stay there! We had just enough time to go to all the Art Suites, see the main attraction which was the Elephant! Popped into the Ice Chapel and have a freezing vodka/cranberry at the ICEBAR before heading back to Abisko. And all this at a fraction of the cost of the private tour!
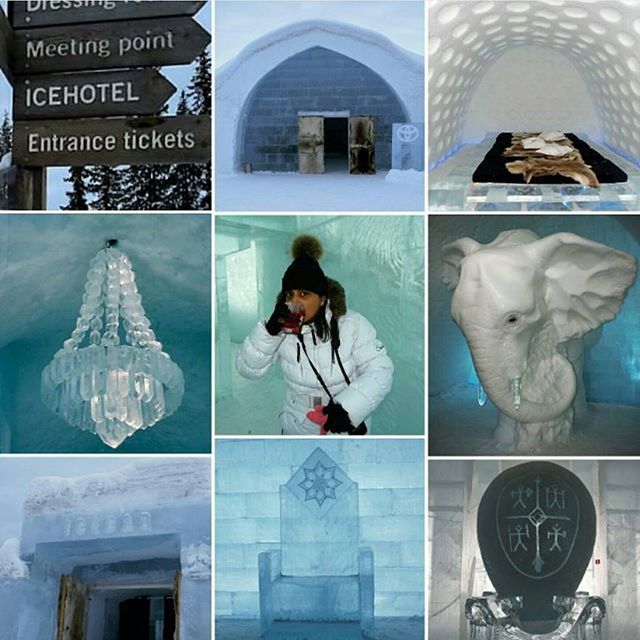
Photo credit: Ruby Jutlay
In the evening we went on the Aurora photo tour which came as part of our package. This was by far the best night of activity we had seen. You do have to bring your own SD card as a Nikon DSLR and tripod and bag are all offered as part of this tour if you don’t have a camera. It was a short walk to the viewpoint which was on a hill. The guide then lit up a fire inside a teepee where we found ourselves retreating to when it got really cold! The moment we arrived we were rewarded with the most spectacular displays! The aurora’s were moving so fast I had trouble keeping up. The other great thing about this tour is when we needed to, the guide would tell everyone what camera settings we should be on to capture these magical moments!
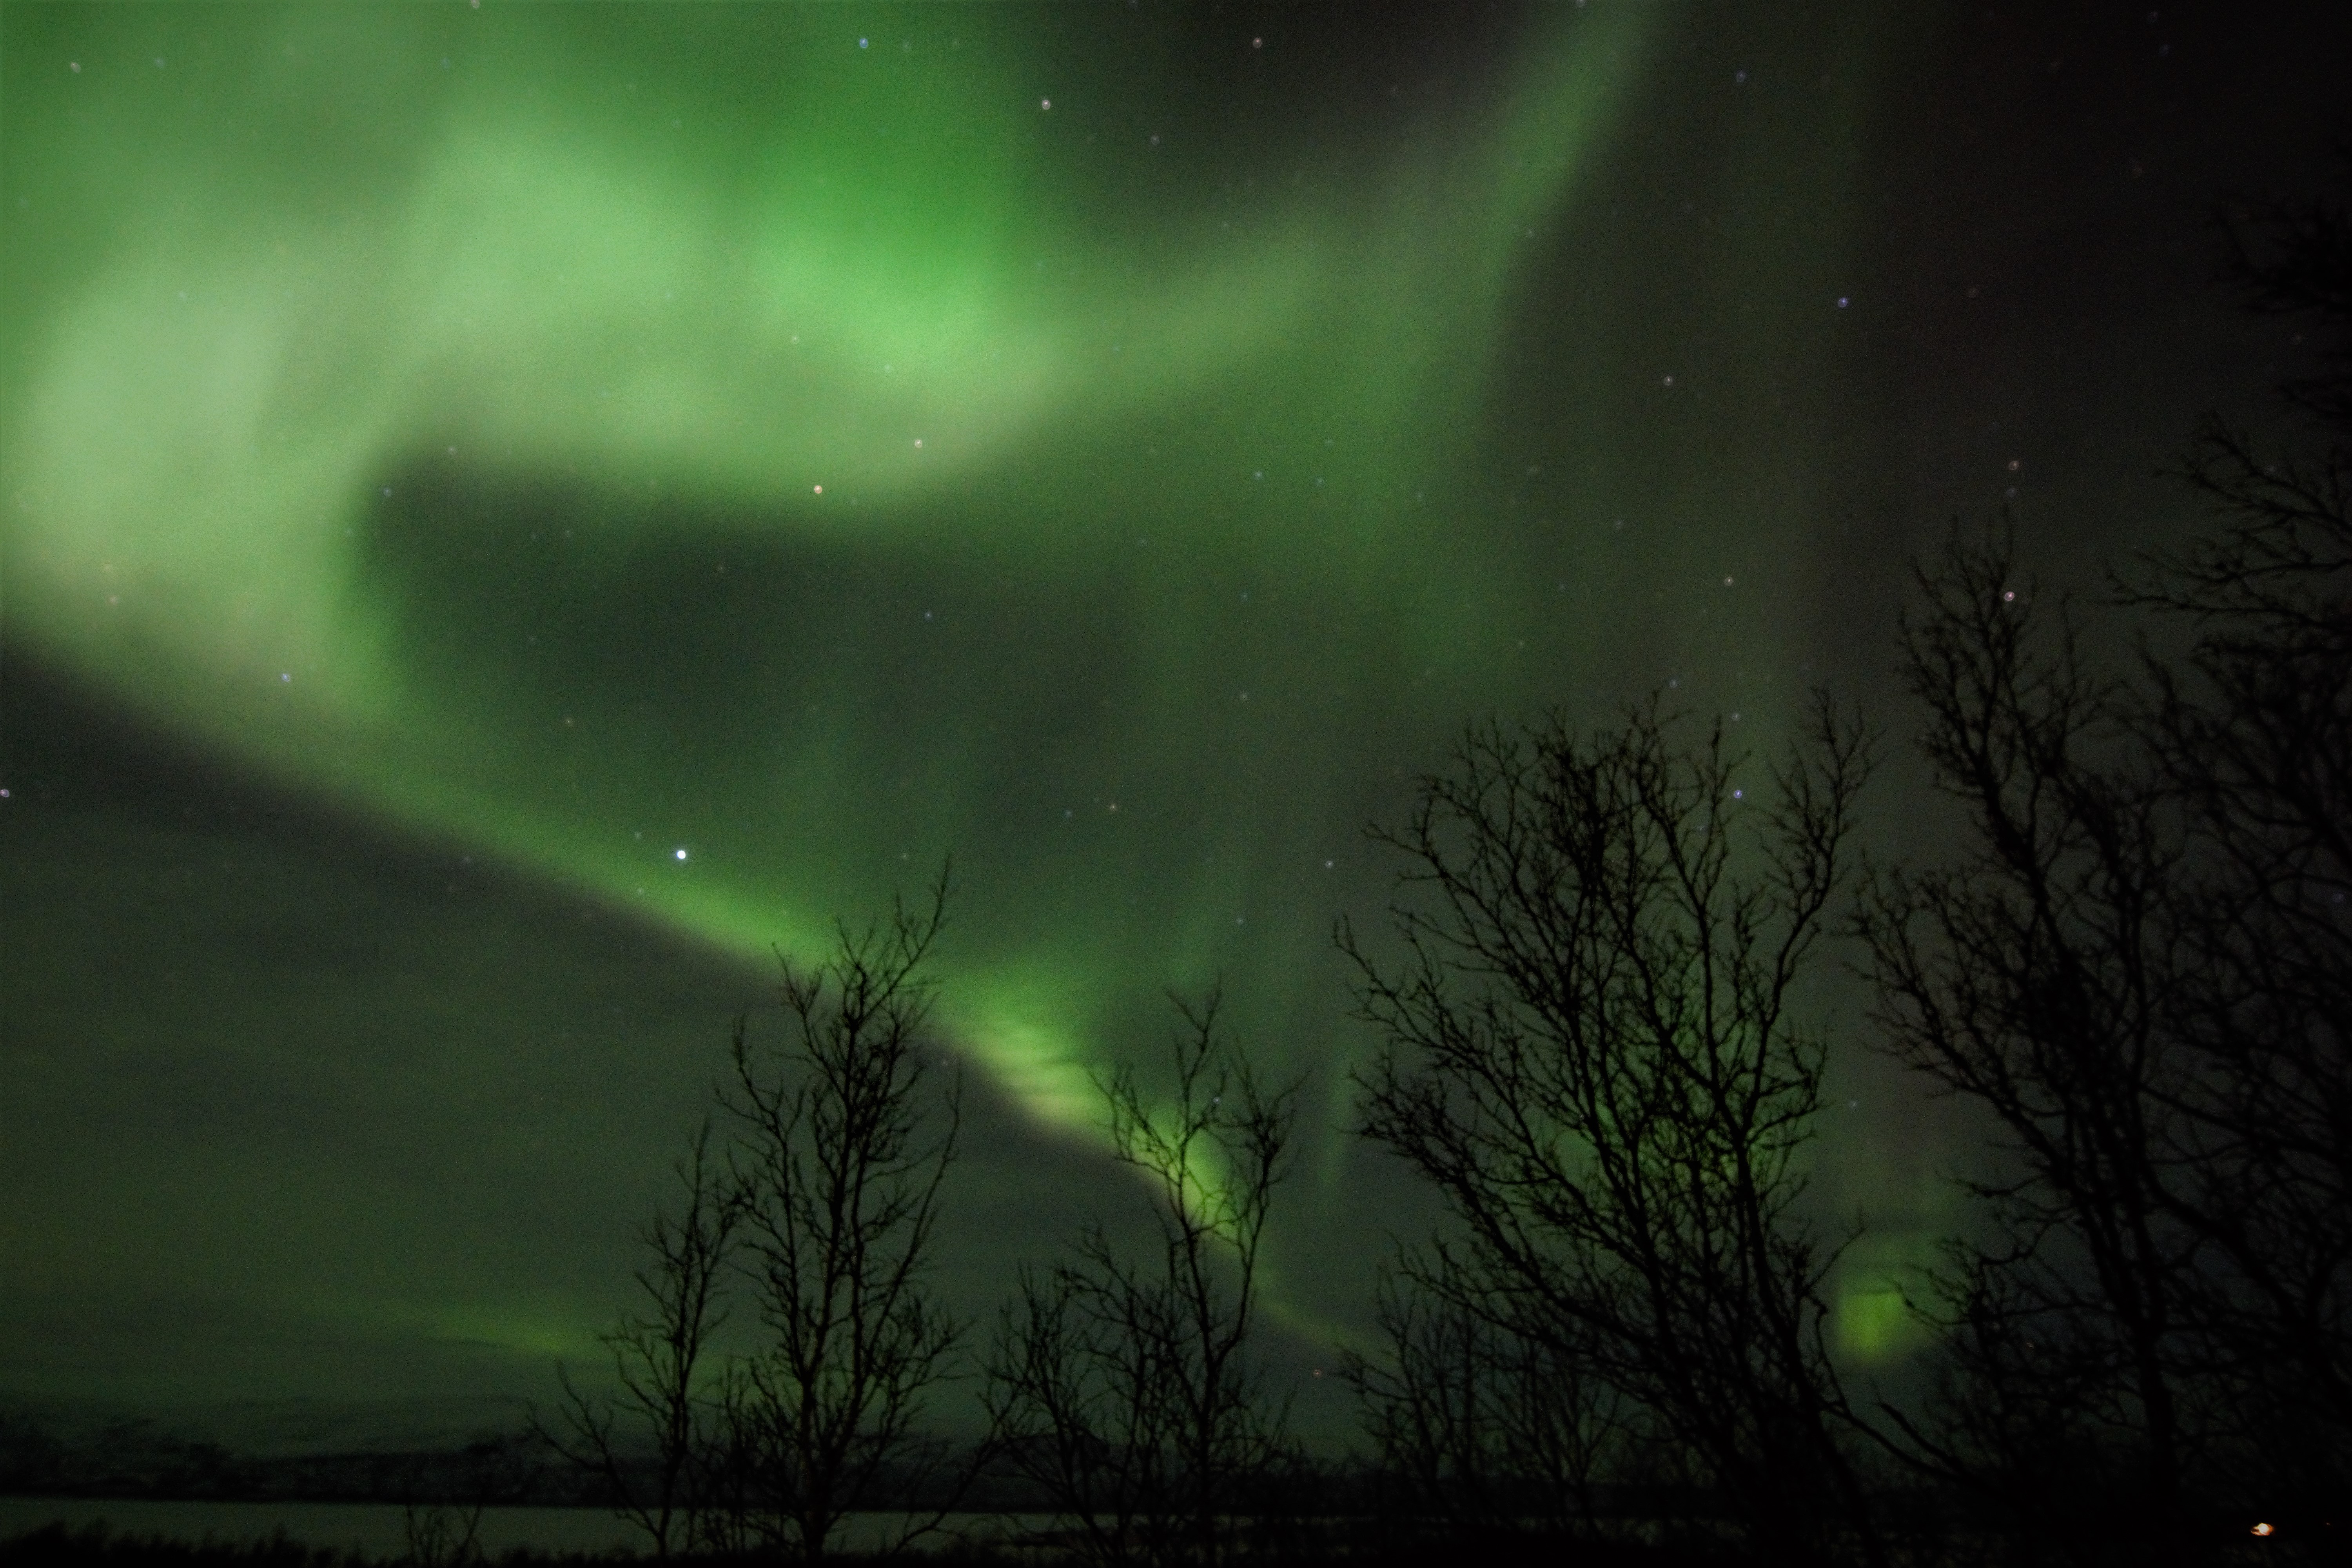
Photo credit: Ruby Jutlay
Day 5 – Aurora Sky Station
The final night saw us travel to the Aurora Sky Station. The tour came as part of our package, but you can book it yourself at the Turiststation STF hotel. To be honest I was little disappointed with all the hype surrounding this station. I felt that the group was quite large and the walk to the chair-lift itself was quite long and slippery (so glad I had my Yaktrax on!). Before you go onto the chair-lift, the guides insist you wear a snow suit as the Sky Station is located at the top of Mount Nuolja, which is 900 meters above sea level. The ride to the top is about 20mins and it is one of the most brutal experiences I’ve had (even as a skier who is used to going on chair-lifts, the weather late at night is something else). Its so dark and cold and just when you think you’ve reached the top, you go over a hill and realise there’s about another 50m to go and the blizzard came out of no where, I’m so glad I opted to wear the snow suit offered by the guides.
Once at the top, it feels really crowded and you spend most of your time in the café as it’s so cold and windy outside. We spent 3 hours up on the Sky Station and we saw very little activity that night. There are two view points that you can climb to, but again there are so many people it’s a bit off-putting as everyone is trying to get the best spot for their tripod.
You are free to leave and return to the bottom whenever you want, but I suggest you depart when the majority of crowd does as we got lost finding our way back to the hotel, as we were one of the last groups to go back down and this is no fun around 11pm!
Other Excursions
There are a number of excursion you can book during the day, but be warned most of these have a 9am start and if you been out all night be prepared to wake up early!
• Husky sledding
• Snowmobile safaris
• Reindeer sledding
• Whale watching trips
• Skiing
• The Sami Experience
Final Thoughts
That pretty much wraps up my guide to see the Northern Lights in Norway and Sweden. Its a life time trip that I know is on many people’s bucket list. It is a must do of course, but its all about planning this trip if it’s your first time. We booked our trip in January for the March visit and already at that point the excursions were already full booked. It really does pay to book early.


